Showing posts with label Food Preservation. Show all posts

Thursday, September 13, 2012

Dilly Beans


In case I had been previously confused, I now know for certain, high paying jobs that impress other people are not important to me.  Instead I am motivated by jobs that match my values and allow me to parent the way I want.  As this blog should make very clear I am heavily invested in how people eat.  Because of this I spent a year at the VNA Family Room working for poverty level wages as their Americorps Vista Healthy Food Coordinator.  At the end of the year the Family Room was making lunches for their preschool in house instead of relying on food from the school district.  My menu included several bean dishes and all the grains where whole grains.  Plus, the children actually ate the food, including vegetables, I prepared.  Watching a child who said the only vegetable he likes was canned corn devour kale chips made me want to do back flips through the classroom.  (It is probably best for everyone that I have never learned to do a back flip).

So this summer when a friend started to tell me how my children's school was hiring a lunch room monitor for the first time and I really should apply for the job I stood there listening to her and shaking my head no the whole time.  When she was done talking somehow I stopped shaking my head and decided I could make the most difference in how the children at the school ate by being there every day.  So now I spend 3 hours smack dab in the middle of the day in a lunch room filled with boisterous children.  I walk around and remind them to eat, offer them taste tests of a new healthy food available in the salad bar that I am sure they will like once they taste it.  I try to keep the children happy and social without tipping over into crazy chaos and bedlam.

I have had feedback from many adults in the building that they would not have taken this job on a bet.  But I have also had several staff I really respect tell me I am doing a great job and they have never seen the lunch room with such a nice kid vibe and still efficient.  I calmly tell them they have not seen me with the classes that are the most challenging.

Truth is most of the time, I love it, and not just because Julian finally has to stop taking chocolate milk.  But man is it exhausting, three hours is like a marathon.  For me to post here I think it will have to be during the window after I drop my boys and school and before I return for work.  Once I decide these Dilly Beans are done curing my boys will bring them to lunch.  Because most of the time my boys still bring lunch from home.  Because I make them slightly spicy with 1/4 tsp of crushed red pepper flakes in every jar, both boys will eat them and sip milk between each bite.
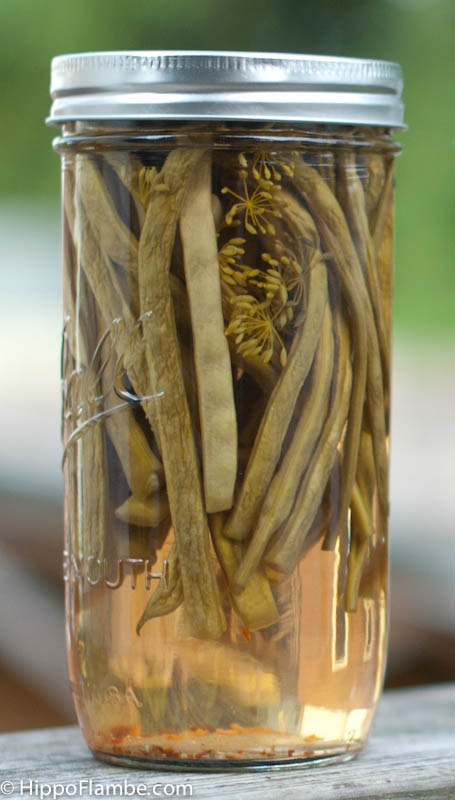


Dilly Beans
Adapted from Ball Blue Book Guide to Preserving to replace cayenne pepper with crushed red pepper flakes (this does not affect safety, I just prefer this type of heat)

2 pounds string beans (I used Rattlesnake and Purple Pole beans from my garden)
1/4 cup canning salt
2 1/2 cups 5% acidity cider vinegar (you can use other 5% acidity vinegars but I prefer the more mellow flavor of the cider vinegar.  Although many prefer the clear color of white vinegar in the brine)
2 1/2 cups water
1 tsp crushed red pepper flakes, or to taste, divided
4 cloves garlic
4 heads dill

Trim ends off beans so they fit in the jars with 1/4 inch headspace (I used the new Ball Pint and a Half Jars).  Combine the salt, vinegar and water in a saucepan and bring to a boil and cook until the salt is completely dissolved.  Pack Beans into jars with 1/4 inch headspace and add 1 clove of garlic for each pint or pint and a half jar with 1 head of dill and 1/4 tsp crushed red pepper.  For quart jars use 2 heads of dill, 2 cloves of garlic and 1/2 tsp crushed red pepper flakes.  Ladle hot brine over the beans with 1/4 inch headspace.  Use a bubble wand or other nonmetal utensil, to press the beans away from the wall of the bar to release any trapped air.  repeat carefully all around the jar.

If need be top up the liquid after removing any air bubbles to maintain 1/4 inch headspace.  Use a damp paper towel to clean the rims of jars before placing lids and rings on top and tightening by hand.  Place filled jars in the canner and process for 10 minutes once the canner comes up to a full boil.  After the 10 of processing time turn the heat off and remove the lid of the canner.  Let the jars and canner rest and cool for 5 minutes before removing the jars to a kitchen towel or receiving blanket to cool on the counter with at least 1 inch of space between all the jars.  Allow the beans to cure in the jars for 2 weeks before joyfully sampling.

Friday, July 13, 2012

Green Coriander


With the recent hot weather we have been experiencing, chances are some of your herbs are starting to bolt.  When my cilantro goes from lush foliage to flowers to seeds instead of missing the herb I greedily gather the green seeds before they dry out and become brown.  Green Coriander has a softer taste than brown coriander seeds with an herb like freshness.  Its flavor is reminiscent of both cilantro and dried coriander.  My children like to eat it fresh in the garden.  I store as much as I can harvest in the freezer to use all year long.

Some of my favorite uses are in a white wine chicken or pork braise, in a sauce for fish, dressing up extra virgin olive oil to drizzle over fresh tomatoes, and in an Indian curry.  This year I have several cups stored away, so I am sure I will be adding to the list of my favorite uses.

The last time I was in my community Garden Plot I pulled out all of my cilantro plants and brought them home to harvest.  One more day and I would have had fully ripened coriander, missing the opportunity for this gardener's only special ingredient.


Sunday, July 1, 2012

Announcing Hippo Flambé's Preserving Index


As the canning season begins in ernest more and more people find my blog looking for answers to canning questions and recipes.  To make this easier for everyone I have created a canning and preserving index for Hippo Flamb&eacute's blog posts.  If you have any canning questions feel free to ask in a comment.

Hippo Flambé's New Preserving Index


Tuesday, September 20, 2011

Preserving Tomatoes: Freezing


Every summer I can an obscene amount of crushed tomatoes.  I make deals with farmers for the tomatoes that are too ugly to sell, harvest flats of them from my plants and keep some out from my CSA share.  As tomato season progresses I begin to panic, fearing that I will never preserve enough to last until the following summer.  Until one day I look at the jars lined up in the basement and I decide I can stop.  Then, as long as I have made enough salsa, and tomato orange marmalade, I freeze the rest.  In addition I freeze any smaller tomatoes throughout the season, because I learned the hard way, canning small tomatoes is time consuming, overly fiddly, and frustrating.

I know many folks who prefer the ease of freezing tomatoes and preserve all of their harvest without canning.  For the bulk of my tomatoes I prefer to spend more time on them in the summer months so I can use them more easily in the winter.  With a quart of crushed tomatoes I can make pasta sauce, soup, or chili easily enough that I think of them as convenience food.  In addition, if the power goes out, or my freezer dies, I won't lose my entire tomato stash.

However frozen tomatoes do have a purpose that goes beyond preserving the tomatoes I can't or don't want to can.  I will admit their primary use is running out of tomatoes too early insurance.  However they are also perfect for recipes that call for just a few tomatoes.  Many times I use part of a quart of tomatoes assuring myself that I will find a use for them in the next few days.  However many times the jar gets lost in the back of my fridge until it resurfaces in scary new colors.  Instead of using a partial quart I take a few tomatoes out of the freezer, rub the skins under running water to remove the skins, cut out the core and proceed with my recipe.  For a small number of tomatoes you can even do this without getting frostbite.


Frozen Tomatoes
I hope it doesn't insult any ones intelligence to write this in recipe format.  I just know some folks skip the blog chatter and scroll down to the recipe.

Tomatoes, local vine ripened flavorful ones
Zip top bags or Pyrex dishes with lids or plastic storage containers

Place the tomatoes in the bags or containers and close.  Place in the freezer.  To use just remove the tomatoes from the storage container or bag, reseal, and return the remaining tomatoes to the fridge.  Rub the tomato under running water while rubbing the skin.  The skin will rub right off.  Cut the core out with a knife.


Tuesday, July 12, 2011

Sour Cherry Raspberry Lime Jam (No Pectin)


Last years sour cherry jam was a success because it set without using commercial pectin, it made a really beautiful translucent jam with preserved cherries suspended within, and many who scored a jar raved about it.  The only problem is my family did not like it.  Turns out we prefer a jam with a more consistent texture and flavor, one where the whole fruit adds body to the whole jam instead of occasional solids floating in jelly.  We are not big jelly eaters and missed the body of the jam having more substance and texture.  Which is fine with me as French preserves are more time and labor intensive requiring multiple steps, fruit straining, simmering etc.  So this year I got to start over after picking 12 pounds of sour cherries at a local orchard.


Last years jam was really just the cherries, so this year I decided to play a little more.  Plus I have a friend with a flat of raspberries at home who I saw in the fields.  So my first inspiration was sour cherry raspberry.  I decided to use lime in place of the usual lemons after seeing raspberry jam recipes made with lime.  Plus my newest summer drink obsession means I have been stock piling limes.  This recipe depends on the pectin in the limes, especially the peels to to gel.  Probably a little easier for the average person to get then unripe green apples.

The results were an unmitigated success.  The boys have enjoyed it drizzled over ice cream and have happily greeted it on toast for 2 mornings in a row without complaining.  Truth be told, after the first breakfast they looked critically at the 4 jars lined up on the counter and told me I needed to make more.  My boys have learned how to judge how many jars of jam they will need to get through a winter.

When I tasted it I was surprised at all the flavors, wondering at first at a subtle background taste I could not place.  Then I remembered the lime, which adds more to the overall taste then the bright acid flavor from lemon juice.  It is tart and sweet with a richness that is addictive.  Plus it set up beautifully with a minimum of hanging over a hot pot in July.  Last summer my kitchen scale broke and has refused to measure in anything other then ounces, or allow me to tare out the weight of anything on top.  I replaced it with a new scale that remembers the previous weight when it turns itself off.  Now as long as I pay attention to when the display goes blank I can slowly weigh cherries as I pit them.  A vast improvement over my old scale where I had to occasionally write down the weight I was at and start over.


Sour Cherry Lime Jam
Note: There is sugar listed twice as it gets added with the raspberries and with the cherries.  I have given conversions from Metric but they are just approximate, I created the recipe using weight.

600 grams [1 1/3 pound] raspberries (mine were frozen, I just put them in the pot still frozen)
200 grams [7/8 cup] granulated sugar
500 grams [1 lb 2 ozs] pitted sour cherries (I have a book that says this is 600 grams or 1 1/3 lbs before pitting, I don't know, I weighed them as I pitted them.  Why measure them twice?)
500 grams [2 1/4 cups] granulated sugar
Juice of 1 lime 2-3 Tbsp (rinds reserved)

Bring raspberries and 200 grams sugar to a simmer, simmer for 5 minutes.  Turn off and allow to cool slightly (I let it cool just long enough to set up my Fruit and Vegetable Strainer).  Set the raspberries aside and combine the pitted cherries, 500 grams sugar and lime juice in a large pan.  Bring up to the simmer and simmer gently for 5 minutes, crushing the cherries with a potato masher as they cook.

Remove the seeds from the raspberries in a food mill, chinois, sieve or a Kitchen Aid attachment. Add the raspberries to the cherries along with the reserved lime peels.  Heat the jam over high heat,  once the fruit is boiling stir constantly until the setting point is reached (this jam was set for me at 220°). You can also do the cold plate test, when you think your jam is set place a small amount on one of the plates in the freezer and place it back in the freezer for several minutes. Test the dollop of jam by pushing it with your finger, if it wrinkles up it is gelled and you can can your jam.  Remove the lime peels from the jam before canning.

Ladle hot jam into hot jars, leaving 1/4 inch headspace.  Wipe the rims clean with a damp paper towel or cloth and place on 2 piece lids and tighten by hand.  Place filled jars in a water bath canner with water covering the jars by at least 1 inch.  Boil for 10 minutes, when the 10 minutes is completed turn off the heat, remove the lid and leave the jars in the canner for another 5 minutes.  Place the jars on a towel, dish cloth or receiving blanket or a cooling rack, with at least 1 inch between jars. Allow to cool completely, 12 to 24 hours. Once cool take off the bands, test the seal by pushing up on the lid with your thumbs. Any jars that have not sealed properly can be placed in the fridge. Clean the top of the jars, label and store in a cool dry place. 

Tuesday, August 31, 2010

Tomato Orange Marmalade


My addiction to canning began 7 years ago with this recipe, all that I love about canning is present in tomato orange marmalade.  It is a product that is inaccessible if you do not make it yourself, one that looks beautiful cooling on your counters for weeks longer then necessary, an enjoyable almost meditative cooking process and of course a flavor that is well worth all the time you invest in it.  The flavor is one that provides a bright sweet flavor to a long winter of stored root vegetables.  I was recently asked what compelled me to make this recipe when I first saw, tomato is not well known as a sweet preserve and many would not even try it.  Honestly I do not remember, it may have been my love of tomatoes, or the way I was imagining it would taste in my head or just an adventurous streak.  Although we should remember that tomatoes are a fruit, so really it should be less of a mental leap then making a tasty dessert with rhubarb, which is a vegetable.

I ended up making Tomato Orange Marmalade in my No Added Pectin Jam Making Workshop last Saturday and I think it is safe to say it surprised all the participants.  Everyone immediately fell in love with it.  One attendee said, "This is my new favorite thing."  A sentiment I fully understand as it is a spread that is just the right side of sweet to be perfect spread on toast or filling a French crepe, but would also be happy paired with chevre.  The tomatoes serve to balance the citrus and temper the bitterness that is usually so prevalent in marmalade.  In the end I think everyone was happy that I called it in to pinch hit for the seedless raspberry jam I originally had planned.

Raspberry jam seemed perfect to teach now as the season was just beginning, giving the participants plenty of time to make it on their own before the season was over.  However I failed to think through the nature of farming and availability.  I was happily remembering picking fall raspberries in the height of the season, when you can take less then thirty minutes to fill a flat with berries.  However this is the start of the fall raspberry season and the picking is frustrating at best.  So in the end I had enough local raspberries to make a batch in my workshop but not enough to swap in and out various steps like a Food Network Star.

In case I have not sufficiently piqued your interest to try this marmalade recipe perhaps my eight year old's undying love for it can persuade you.  This has been Sebastian's favorite since he was 3, the year I ran out mid winter and unable to imagine his diet without it found out a quart jar of home canned crushed tomatoes would work in the recipe.  Every time Sebastian introduces someone to it and they fall in love it makes his day.  He loves knowing that other people have discovered one of his favorite culinary joys.  If you do try this please let me know in the comments, I know he will love to read them.


Tomato Orange Marmalade
Adapted from Gourmet 2003

It is important that you use the best quality tomatoes you can for this recipe.  You can use any color of tomato you want, a mix is especially striking.  Don't use paste tomatoes as they do not have enough liquid in them.  If need be in winter you can make a batch using 1 quart jar of home canned crushed tomatoes.  However supermarket tomato look alikes will not work.  A friend tried that once and when I asked how it was she replied, "Well... I ate it."  Which meant no one else would.


3 pounds peeled, cored and chopped ripe heirloom tomatoes, including juices (the weight is after peeling, coring and chopping, including the weight of any juices)
3 cups sugar
2 organic juice oranges, washed
1 organic lemon, washed
1/8 tsp salt

Place peeled, chopped tomatoes and their juices in a 5 to 6 qt or larger, wide pot, (the ingredients will all fit in a smaller pot but you need to leave space so they will not bubble over, ideally it should be at least 9 1/2 inches wide to encourage rapid evaporation).  Slice oranges and lemons as thinly as possible, including peel and pith.  I slice mine on my mandolin using the thinest insert and then remove all the seeds and slice the rounds into 4 pieces (and the pieces that are only peel I julienne, you can also quarter the fruit and then slice it as thinly as possible with a knife.

Place the lemon and orange slices in the pan with the tomatoes, checking again for any citrus pits you missed, in the pot with the tomato.  Add the sugar and salt and place over moderate heat while stirring until the sugar has completely dissolved.  Turn the heat to high and continue to cook until the setting point is reached.*

Using a canning funnel ladle hot marmalade into hot jars leaving 1/4 inch headspace.  Run a bubble wand or small knife around the inside of the jar to remove air bubbles.  Use a damp paper towel to clean the surface of the rims, place a clean lid on top, add the rings and tighten as tightly as you can with your hands.  Place the filled jars in a water bath canner and process for 10 minutes.  After the 10 minutes is up remove the lid, turn off the heat and leave to rest for 5 minutes before removing the jars to cool on a towel or receiving blanket.


*How to test the setting point of jam:
This recipe is a great one to learn how to make preserves without added pectin as it gives you a visual cue when to begin testing.  At first the ingredients all look like separate items, tomatoes, juice and citrus slices.  I never begin to test this recipe until the ingredients take on a cohesive look, like they are all one product and most of the liquid is evaporated.  When making jam do not expect it to look like jam when it is still hot, hot jam is still a liquid unless you have moved beyond the gel stage and gotten to the cement stage.

Once it begins to look cohesive begin testing, for this recipe I rely almost exclusively on the cold plate test.  I place 2 saucers in the freezer and when I want to test the set I place a dollop on the plate, remove the marmalade from the heat, and place the plate in the fridge.  After a few minutes check the plate, the marmalade should remain in a mound that does not run if it is done, if you run your finger through it it should leave a line.  If you want a firmer set it should wrinkle before your finger if you push the mound, I personally prefer a softer set then that with this one.

If you do not trust your set testing abilities do the cold plate test and when you think it is set take the pot off the heat, place it in the fridge and test the set the next morning.  If it is set heat it back up to boiling before ladling into hot jars and canning (the product must be hot to safely can it).

Thursday, July 8, 2010

Sour Cherry Jam (No Commercial Pectin)


This winter as I am spreading tangy sweet sour cherry jam on my toast I know I will romanticize everything that went into making it.  I will bite into my breakfast and the vivid tart cherry flavor will fill my mouth (a flavor that oddly cannot come from sweet cherry jam) and I will have fond memories of picking the cherries with my family.  I will remember my strange enthusiasm and zeal while picking in the heat, which caused me to pick close to 20 pounds.  My memory will gloss over the time I spent, during an unbearably hot, record breaking, July heat wave, cooking batch after batch of boiling jam.  I will no longer remember the blanket covering the door to the kitchen so the heat would not poison the rest of the house.  I may even conveniently forget resorting to cooking in my bathing suit.


The jam will only remind me of the best of sour cherries, the taste of them in your mouth, my boys working together to pick enough for their crazy mother,  everyone in the family taking a turn swinging maniacally across the fields on a rope at the orchard, going to the beach together after picking to jump in the cold water and for the boys to dig extensive tunnel systems in the sand.  The jam will provide me with happy memories of the summer just as this blog serves to preserve the best parts of raising my children.  Like sitting here with them in my room, with the air conditioner turned on, listening to Sebastian read to Julian, while I write this post.  Without recording the screaming stand offs between parents and children, like the one we had at dinner the other night.


Arguments over leaving the table, not coming to the table in the first place and the general rudeness of children whose job it is to think only of themselves.  In my memory this jam will be just like those family dinners, the ones we are constantly told to have as they are the cornerstone of strong families, because clearly they never dissolve into the general mayhem and unpleasantness which cause Lewis and I to look  at each other, trying to remember what dinners were like pre-children.  Twenty years from now I will look back at our dinners as a magical part of raising my boys where they shared what they were thinking and doing and enjoyed ALL the food I lovingly prepared and served.


If you want to make cherry jam so you can wistfully dream about the feeling of the sun warming you this winter you will need to add some form of pectin as cherries are low in natural pectin.  Personally I do not like using commercial pectin (except for in my strawberry freezer jam with cointreau and drambuie).  Commercial pectin requires a large quantity of sugar to gel, producing a jam that is overly sweet for my taste and does not highlight the flavor of the fruit.  Some folks use Pomona's Pectin as it does not need any sugar to gel, however when I tried it there was a chalky texture to the jam that I found unpleasant.  For pectin in this jam I used unripe apples from the same orchard where I picked the jam.   If you do not have access to unripe apples you can use granny smith or crabapples instead.  If you have a local pick your own apple orchard it is worth asking to pick some fruit now to use as pectin.  I was given my pectin apples for free because I only took the apples that had been damaged by hail, and only a few from each tree.


No Commercial Pectin Sour Cherry Jam
(Be sure to check out my newest no pectin sour cherry raspberry lime jam)
This is not a complicated recipe, I just have a lot of information on canning in the directions.

1200 grams pitted sour cherries (approximately 6 cups pitted and halved sour cherries)
700 grams granulated sugar (approximately 4 cups, really 3.65 but 4 cups will work)
4 small unripe, still green apples roughly chopped, core and all (approximately 2 cups)  If you don't have access to unripe apples use granny smith or crabapples
Juice of 1 small lemon (pits reserved, they are high in pectin as well)

Put the sour cherries lemon juice and sugar in a large non reactive pan.  Place the chopped apple and lemon pits in a giant tea ball or a muslin bag and add to the pot.  This makes it possible to remove the apple mush and lemon pits later.  Bring the mixture to a rolling boil while stirring and cook for 5 minutes, the sugar should all be dissolved and the apple pieces should start to soften a little.  Turn off the heat and cover with a pan lid and place in the fridge overnight, I usually refrigerate mine for at least 24 hours, but that is only because I do almost all of my canning at night.

The next day, or night, place two small white plates in the freezer to test the jam with, put the pot back on the stove and bring to a boil, stirring occasionally, while prepping your jars, lids and canning pot.  You will need approximately 5 half pint jars, I always prep extras to be safe.*

Once the fruit is boiling stir constantly until the setting point is reached.  When you think your jam is set place a small amount on one of the plates in the freezer and place it back in the freezer for several minutes.  Test the dollop of jam by pushing it with your finger, if it wrinkles up it is gelled and you can can your jam.  The setting temperature for jam is around 220°, begin testing when the temperature is around 218° to 219°. The National Center for Home Food Preservation says the temperature test is the most dependable, however I have made syrup by relying only on temperature so I use both temperature and the clean plate test.

When your jam is sufficiently gelled remove the jars from the canning pot and fill the clean jars using a canning funnel.  Leave 1/4 inch headspace on the jars and clean the jar rims using a dampened paper towel before placing on the lid and tightening the screw on bands with your hands, before placing in the canning pot.  Bring the canning pot to a boil and boil hard for 5 minutes for sterilized jars and 10 for unsterilized jars (sterilizing jars can only happen in a boiling water canner,  not the oven or dishwasher).  Once the jars have boiled for the correct time turn off the heat and take off the  canner lid.  Allow to cool with the lid of for 5 minutes before using a jar lifter to remove the processed jars.  Place the jars on a towel, dish cloth or receiving blanket or a cooling rack, with at least 1 inch between jars.  Allow to cool completely, 12 to 24 hours.  Once cool take off the bands, test the seal by pushing up on the lid with your thumbs.  Any jars that have not sealed properly can be placed in the fridge.  Clean the top of the jars, label and store in a cool dry place.


*To prep your jars and lids, wash the jars and place in a caning pot on a canning rack with hot water to cover.  You now have 2 choices, you can bring the canning pot to a rolling boil and boil the jars for 10 minutes.  If you do this you only need to boil the filled jars for 5 minutes.  Alternatively you can bring the canning pot to 180°, with this option you will boil the filled jars for 10 minutes (this is what I do, it means less time heating the kitchen with a giant canning pot of boiling water).

Monday, October 19, 2009

Lacto Fermented Green Tomato Pickles


As a child we used to get green tomato pickles from Williams Chicken near my Grandmothers. They would be floating in a large plastic tub of brine and they were sour and delicious. My brother was mildly addicted to them. Even though I understand his obsession with them, I still do not fully understand the night he created, "Green tomato stuffed hamburgers". Let me just suggest you never attempt to make them and leave it at that. Although I have to admit the vegetable soup with the egg poached in it he made another time was worse, maybe it was the addition of the melted stinky cheese.

Several years ago I consulted the Ball Blue Book and tried to make green tomato pickles. Some folks liked them, but for me it did not match my memory of pickled green tomatoes. This summer when I was making lacto fermented pickles I realized the pickled green tomatoes we all loved where lacto fermented, not vinegar, salt and water. The folks from Flack Family Farm told me to use the same procedure I would use for any vegetable. Then they thanked me for giving them an idea for using their green tomatoes.

The good news is this method of pickling couldn't be easier, no boiling water bath canner, no hot brine. Plus lacto fermented foods are super foods, in modest quantities anyway. They improve vitamin absorption and correct the environment of your digestive system. The down side is after 3-4 days at room temperature they have to be stored in the fridge. The basic procedure comes from the Nourishing Traditions cookbook. Although there is no recipe for green tomato pickles in the book. It is better to make the pickles with homemade whey as they are lower in salt and it works more consistently. Whey is really simple to make using full fat yogurt that active yogurt cultures. The only downside to making it with whey is you have to plan ahead, and have yogurt in the house.


Lacto Fermented Green Tomato Pickles
For 1 quart (make as many or as few as you wish to store)

1 wide mouth quart preserving jar
enough green tomatoes to fill the jar to 1 inch below the lid (only use tomatoes that are totally green, the ones that made you crazy at the start of the summer)
1 dill head or 1 fresh dill sprig or 2 Tbsp dried dill or dill seed)
1 hot pepper with the stem pulled off (optional)
1 large or 2 medium or 3 small cloves of garlic
1 Tbsp canning and pickling salt
4 Tbsp homemade whey (or substitute an additional Tbsp of canning and pickling salt)
water

Wash the tomatoes and remove their stems and place in the clean wide mouth jar to 1 inch below the rim. Add the garlic and hot pepper between the tomatoes and add the salt and whey, if using. Fill the jars with water to 1 inch below the rim and screw on the lids. Store at room temperature for 3-4 days (3 days when kept at 72°) before placing on the top shelf of your fridge. They can be eaten after the 3 - 4 days but are better after a month of storage. It's normal if the brine is fizzy or there is white foam floating on the top. If the pickles go bad the smell will be completely off and you won't want to eat them.

As a full disclosure thing, the green tomatoes in the photo are not fermented yet. When done they will be more of an olive green color. I just wanted to post this while there were still green tomatoes for people to use.